Instructions for Removing and Installing the Working Gas Regulator
Removal
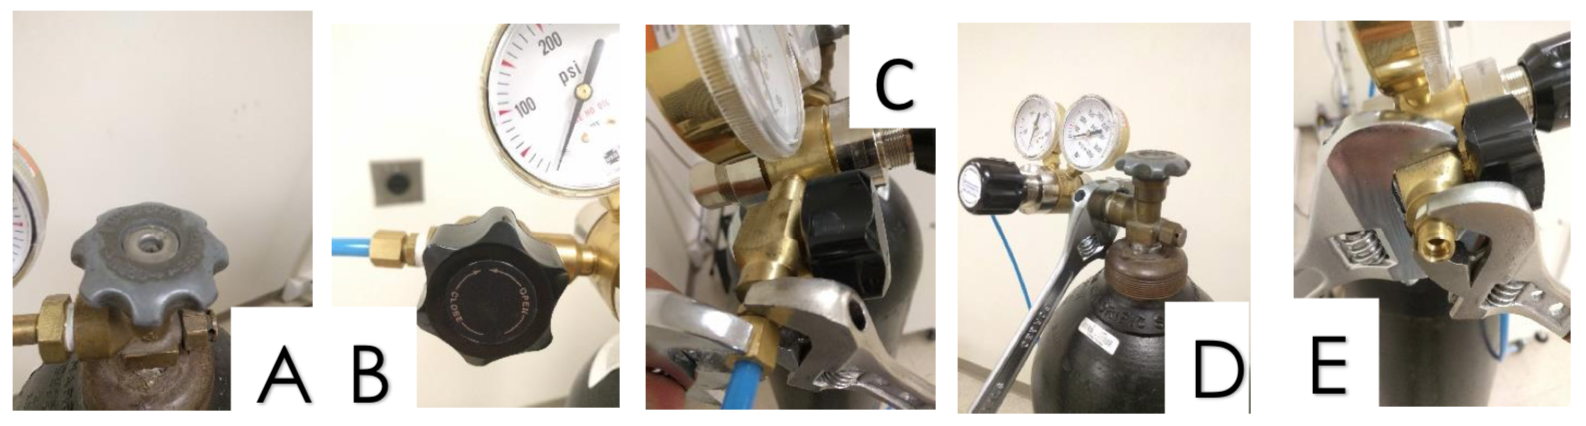
- Close both the tank shutoff valve (A) and the regulator shutoff valve (B)
- Remove the tubing connected to the regulator by using two 14mm wrenches. Hold thefittings as shown in diagram (C) and turn the outermost fitting counter-clockwise to loosen. There will be pressure in the line, so loosen the fitting slowly to allow the pressure to bleed off.
- Once loosened, remove the tubing from the regulator.
- Using an adjustable wrench, begin to loosen the regulator from the tank (D) by turningthe fitting counter-clockwise. Again, there still will be pressure in the regulator, pleaseloosen slowly to allow this pressure to bleed off.
- Once loosened, remove the regulator all the way.
Installation
If you are installing this regulator for the first time, the fitting on the tubing end of the regulatormust be changed. Proceed to “Fitting Change” at the bottom of this page.
- Check to make sure both shutoff valve (A & B) are closed.
- Thread the regulator onto the tank by turning the fitting clockwise. (D)
- Tighten the fitting hand tight, then another 1⁄4 turn with an adjustable wrench.
- Attach the tubing to the other end of the regulator, turning the fitting clockwise.
- Tighten the fitting hand tight, then another 1⁄4 turn with two 14mm wrenches. (C)
- Once both fittings are tight, please adjust your regulator to 5-10 PSI.
Fitting Change
- Remove the fitting on the regulator that is currently installed. Using an adjustable and 14mm wrench, hold the regulator while loosening the fitting.
- Apply Teflon tape to the fitting supplied to your glovebox. The Teflon tape only needs to be applied to the threads to be installed into the regulator.
- Install the fitting into the regulator. Hold the regulator from turning with the adjustable wrench, while tightening the fitting with the 14mm wrench.


